For more information, check General Gameplay Tips below.

(06/08/17) Vale Guardian - Tank Chronomancer POV

(22/03/17) Gorseval - DPS Chronomancer POV

(12/04/17) Sabetha - Chronomancer POV

(17/07/17) Matthias - Chronomancer POV

(13/04/17) Escort - Cave and Tower Chronomancer POV

(18/03/17) Escort - Main Team Chronomancer POV

(13/06/17) Keep Construct - Tank Chronomancer POV

(31/03/17) Xera - Tank Chronomancer POV

(20/03/17) Xera - DPS Chronomancer POV

(29/05/17) Cairn - Chronomancer POV

(16/05/17) Samarog - Chronomancer POV

(19/07/17) Deimos - DPS Chronomancer POV

(19/07/17) Deimos - Tank Chronomancer POV


Note: Take
Feedback
on Matthias instead of
Crystal Sands
.
If you lack CC drop
for
.


(14/11/17) Matthias - Condition Mirage Clone Build POV

(06/06/17) Matthias - Condi Mesmer POV

Tips for each encounter - Click on each section below to expand

Mirage Condition
  • Try to stand inside your target’s hitbox to get all hits from
    .
  • Keep in mind that your dodge doesn’t actually move you.
Chronomancer Support
Traitline Variation & Explanations
  • Domination/Inspiration: This build easily keeps up Quickness and Alacrity and gives you the ability to share Aegis via
    . This build has really low personal DPS.

  • Illusions/Inspiration: This build is the easiest for keeping up Quickness and it has more DPS than all the other Inspiration builds. However it doesn’t offer you anything apart from that and if you want DPS you usually go Duel/Illu, it is the least used Inspiration build.

  • Chaos/Inspiration: This build can keep up Quickness and Alacrity but also keep up ~11boons average on real raid encounters. That is why it synergises well with Elementalists’s
    and is the best option for bosses where Aegis sharing isn’t needed.
  • Dueling/Illusions: This build has the highest personal DPS on support chrono, can keep perma Alacrity and Quickness (only with
    which you always take while playing Duel/Illu). It is used on bosses where you don’t need CC. You need Shield offhand on this build to keep perma Alacrity via
    since you don’t have
    .

How to CC & what you can do to improve it
  • On Domination/Inspiration,
    increases stun and daze duration of the following skills:
    • .
    • .
    • However, It doesn’t affect
      .
  • Take
    if you are actively using
    , this is dependant on your party. Otherwise Gorseval (for last CC) and KC (since you can summon phantasms in orb phase).

  • When using
    , walk out away from the boss before using to get more hits on large hitboxes. Depending on the boss you chain your cc’s and don’t waste everything on one.
  • Try to coordinate your CC skills: for example on sloth you want always 1 Chronomancer to use
    for each breakbar.
  • If you have a sword offhand equiped, you can double press
    to access to
    (while you are casting it make sure to not get hit as it will trigger the riposte).
  • works with
    however it only works if your current weapon set has the sigil. Therefore you’ll want to get a shield, focus and pistol with
    to ensure you don’t miss out on the proc.
  • To Clarify - If you swap weapon during
    and your 2nd weapon set does not have this sigil then it will not proc.

Well Placement
  • Make sure you place your wells within range of your team.

Tanking & Toughness
  • Vale Guardian, Gorseval, Keep Construct, Xera, Deimos, The Broken King, The Soul Eater and Dhuum have an agro mechanic which causes them to always focus the player with the highest toughness. However, this doesn’t mean that you should always have as much toughness as possible, just that you have to have slightly more than your other squad members, except for the following instances:
  • On Vale Guardian you should run slightly higher toughness(Minstrel works well here) to be able to tank his auto attacks.
  • If you are the Tower Mesmer for the Escort event, you should be as tanky as possible.
  • On the Broken King you should also play as tanky as possible as more DPS won't make the fight significantly faster and being tanky allows the druid to not focus on healing you as much. In case you have problems surviving you can just range tank him as well.
  • The most important thing to note is that you should try to dodge or move as little as possible when not necessary so the boss stays in place. You can add as much toughness as you want if you need it.
  • As tank don’t turn to your party and don’t move the boss to much. Only when it is unavoidable like deimos blacks. You want to be tanky enough to not die. A dead mesmer is useless, take as much toughness as you need to stay alive when tanking any encounter.


Chronomancer Support
Tank Chronomancer
Build & Weapon set
  • You should play Domination/Inspiration so the Druid doesn’t have to heal you after each green. Offhand Sword & Shield for CC and block.

Non tank Chronomancer
Build & Weapon set
  • You should play Chaos/Inspiration since the Druid can heal you. Offhand Sword & Shield for CC.

  • Delay your sword skill 2 (
    Blurred Frenzy
    ) so you have it available to avoid getting hit by BLUE AOES.
  • here is used to break quickly the blue guardian during the split phases (66% & 33%). Coordinate with the other Chronomancer who uses it first, as it won’t be off cooldown if you used it in the first split.
Midway:
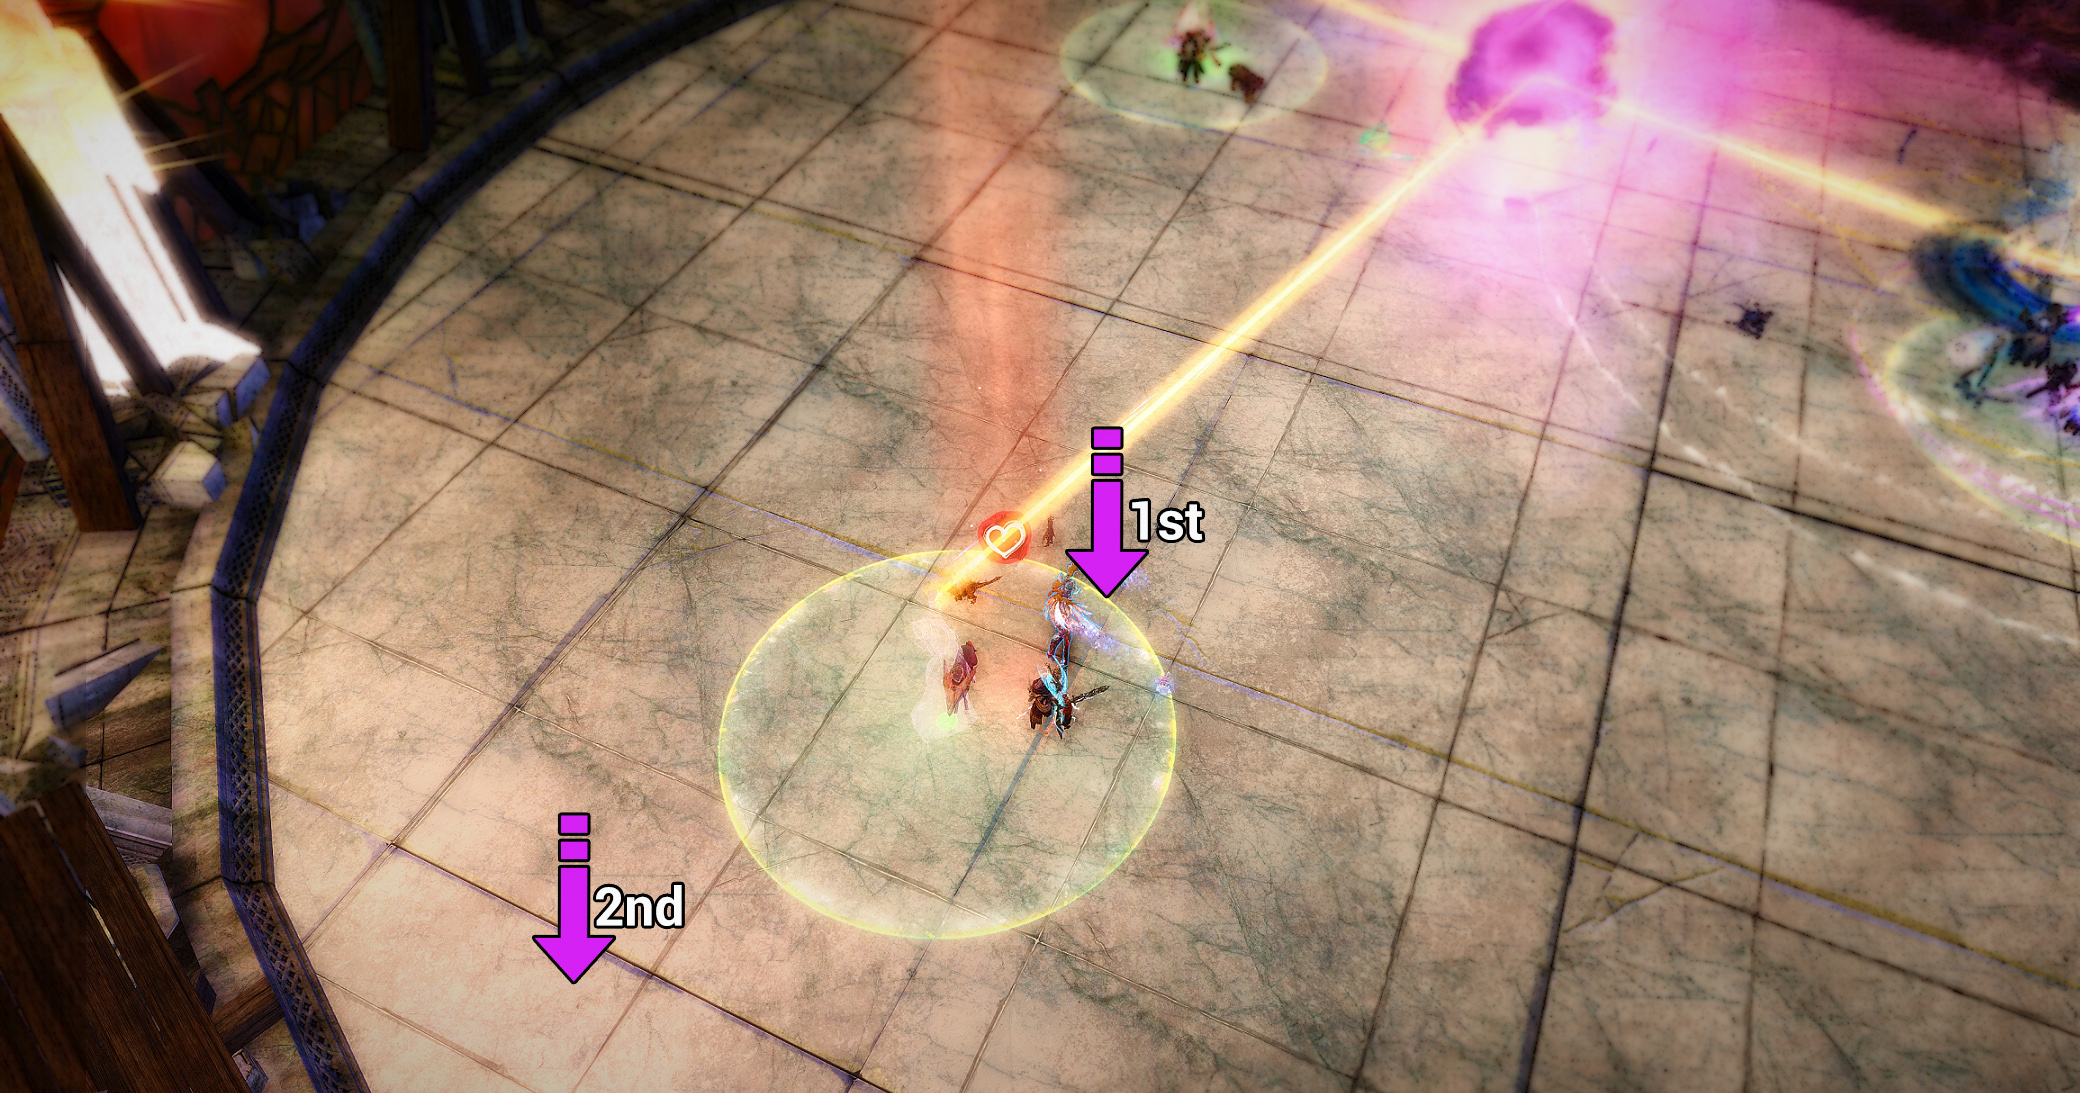
  • For VG you should tank the first two phases in the middle, on the opposite side of your team, if you have good dps. In phase 2 you should go out of the ticking area but you can still tank in the middle you just have to move to the left abit to not get ticked down. In phase 3 you want to move halfway to the left edge of the red area and burst him down there:
Sideway:
  • Tank between red and blue area for phase 1 phase 2 in phase 3 if you trust your druid you can aswell but he has to camp
    when you have both ticking areas there. You always want to move slightly to the non ticking area to stay alive.


  • You can blink past trigger points during the run and use portals to skip having to capture the exploding circles.


Chronomancer Support
Tank Chronomancer
Build & Weapon set
  • You should play Chaos/Inspiration here. Offhand Focus to pull in the spirits & Shield to CC.

Non tank Chronomancer
Build & Weapon set
  • You should play Chaos/Inspiration here. Offhand Pistol & Shield to CC.

  • If you have high dps (only 1 Slam Attack per phase) :
    yourself to share Aegis (
    ) so your team doesn’t have to dodge Gorsevals Slam Attack.
  • If you have normal dps (more than 1 Slam Attack per phase) :
    yourself to share Aegis (
    ) or shatter then use
    to share Stability from
    so your team doesn’t have to dodge Gorsevals Slam Attack.

  • here is used break Gorseval quickly. If your squad lacks DPS it’s recommended to wait a bit before using(slow cc).
  • Coordinate with the other Chronomancer to decide who uses
    first/second. If you use it in the first phase it will be off cooldown in the third phase.
  • If you want to break Gorseval faster you can run
    on your offhand weapons.


Chronomancer Support
Chronomancer 1
Build & Weapon set
  • You should play Duelling/Illusion here. Offhand Focus for pull & Shield for Alacrity.

Chronomancer 2
Build & Weapon set
  • You should play Duelling/Illusion here. Offhand Sword & Shield for Alacrity.

  • here to make it easier to maintain Quickness. You can cast it when one of the players assigned to do cannons returns, as they might have missed your normal quickness rotation. You should coordinate with the other Chronomancer who uses it first.
  • The Chronomancer with the focus should pull in the triple bandit spawn.


Chronomancer Support
Both Chronomancers
Builds & Weapon sets
  • You should play Chaos/Inspiration here. Offhand Focus for pull & Shield for CC.
  • Take
    in organised groups (Co-ordinate with the other Chronomancer) and take
    in unorganised groups.

  • Shatter at the end of the breakbar then use
    to share Stability from
    .
  • You should have
    on your offhands and also run
    (It’s a Master Trait in Inspiration).
  • Its worth remembering that slubbing groups spawn at; 6:30, 6:00, 5:30 and 5:00. Use
    Temporal Curtain
    to pull these adds ontop of Slothasor.
  • You can
    yourself (make sure to have at least 2 clones as you
    ) and jump repeatedly inside of Slothasor’s hitbox to block the projectiles he shoots out during his shake attack.


Chronomancer Support
Both Chronomancers
Builds & Weapon sets
  • You should play Domination/Inspiration. Offhand Focus for pull & Shield.


Chronomancer Support
Both Chronomancers
Builds & Weapon sets
  • You should play Chaos/Inspiration. Offhand Sword & Shield for defense.
  • If you are not running a Condition Mirage then one Chronomancer needs to take
    instead of
    .

  • If you are lacking CC, one of the Chronomancer can delay his rotation until the first sacrifice to use his
    in
    so it is off CD for the 2nd/3rd sacrifice. If the first sacrifice happens to be you, you might aswell ALT + F4.
  • At 40% when Matthias transforms, time your well(s) so they expire after all bombs have exploded.
  • Co-ordinate with the other Chronomancer (and Condition Mirage) as to who will use
    1st, 2nd and 3rd.
Mirage Condition
  • Take
    over
    . You have to use it when Matthias starts channeling his projectile attack.
  • You can use
    as a gap closer to help you with mechanics.


Chronomancer Support

  • You should play Domination/Inspiration here.
  • Here you should take
    .
  • If you are Cave/Upper Chronomancer then you should take tankier gear. If you are the Main Team Chronomancer just take your normal offensive gear.
  • Both
    Portal
    and
    Mimic
    are required if you are playing the Upper Chronomancer. If you want to have an easier time as Upper Mesmer you can swap
    Signet of Inspiration
    for
    Blink
    .

Insta Cap Method
  • The idea behind this method is that one mesmer handles the towers and
    the entire team, aside from the Druid. If everyone takes the
    , you are able to instantly cap the tower. This method is safer and faster than splitting the team up.
  • The Chronomancer that takes care of the first 3 towers should run minstrel to be comfortable when tanking mobs. Before opening the first
    , you should use
    inside your
    . This way you will have
    for the 2nd tower as well.
  • As you used Minic inside your
    you can also
    this 2nd
    , allowing you to have
    available again for the 3rd tower. By only using one mesmer for the first three towers, this lets you 8 man the mobs and thereby clear faster.
  • The 2nd mesmer doesn’t need
    , as he only has to do the
    to the 4th tower by using the ley line. Since the second mesmer isn't minstrel he can take the leyline just as the group takes the
    back down from the 3rd tower. The 1st Mesmer can stand on the turret and tank the mobs to help out if you choose to. After you insta cap the 4th turret the 1st Mesmer stands on it tanks the mobs and his
    will be off cd for the 5th turret.


Chronomancer Support
Both Chronomancers
Builds & Weapon sets
  • You should play Chaos/Inspiration. Offhand Focus for pull & Shield for CC.
  • If you have high dps, go
    as have to CC more often.
  • If you have normal dps go
    .

  • yourself to share Aegis (
    ) your subgroup when Keep Construct does his Jump Attack.
  • Playing focus here will really help your orb pusher as you can pull the orb through the unstable rifts.

  • Mid tactic:
    • The Tank chronomancer takes the aggro of the jump, by walking under the boss, and moves him between the two spawning illusions.
    • In phase 1 the jump is too late so you have to move the boss with yourself between the two statues.
    • Make sure the 2 people with fixation both stay on the left side of the bosses hitbox which will make it easy to cleave down both illusions.
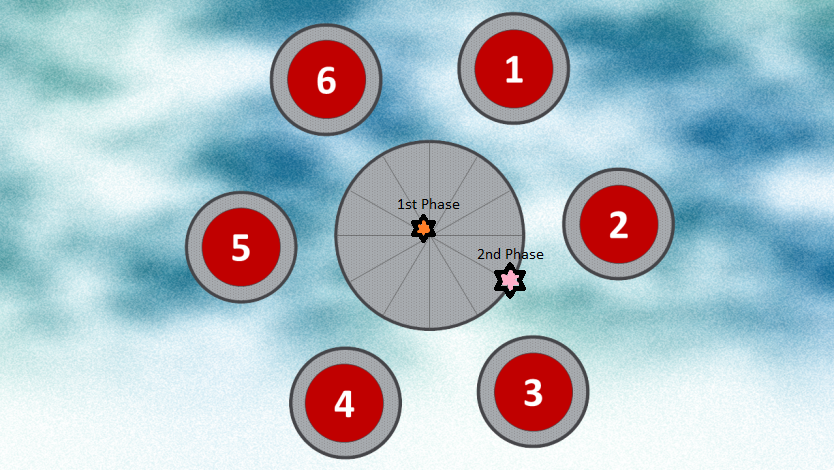
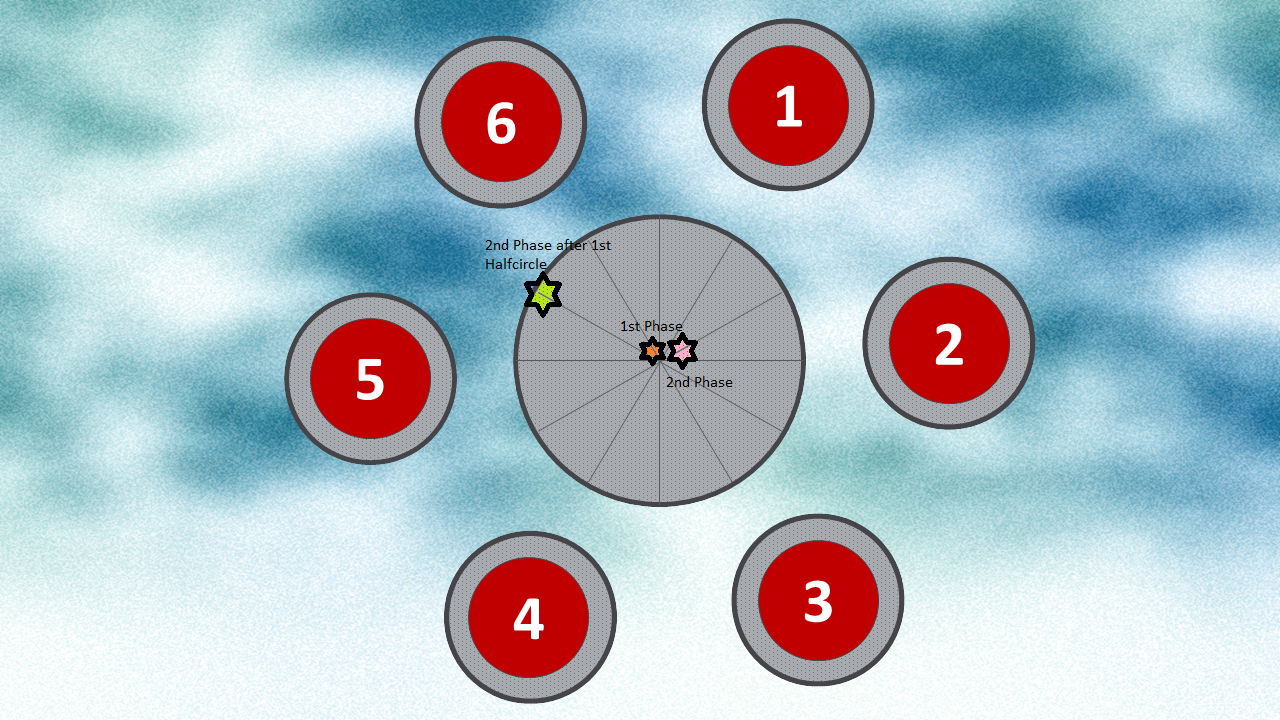
    • As for pulling the orb out, chronomancers go to the west circle 1 mesmer places his
      Temporal Curtain
      on the edge of the green circle and the other one pulls out. This way you instantly pull through the rift and have 1 orb damage buff.
    Temporal Curtain
    placement:


    Side tactic:
    • The Tank chronomancer takes the aggro, by walking under the boss, and moves him to the left of the arena, where ever the illusion spawns.
    • After the first illusion is dead you should move the boss towards the 2nd illusion.
    • Use
      Temporal Curtain.
      to pull the orb in rifts depending on how many orbs you do just make sure to not use both on the same rift.


Chronomancer Support
Both Chronomancers
Builds & Weapon sets
  • You should play Chaos/Inspiration here. Offhand Focus for pull & Shield for CC (also CC on trashmobs).

  • Decide with the other Chronomancer as to who will pull the human adds and who will pull the illusions.
  • Using focus allows you to also pull an orb on the 1st platform.
  • As the tank avoid turning in group’s direction if Xera is doing Blurred Frenzy, as it will most likely kill them. Save your
    Blurred Frenzy
    so you can use it while she uses her blurred frenzy, this way you don’t need to dodge it.


Try Hard Tanking Positions


Lower DPS Tanking Positions


Chronomancer Support
Both Chronomancers
Builds & Weapon sets
  • You should play Duelling/Illusion here. Offhand Sword & Shield for Alacrity and defense for the AoEs.

Mirage Condition
  • DPS golem.


Chronomancer Support
Both Chronomancers
Builds & Weapon sets
  • You should play Dueling/Illusion here. Offhand Sword & Shield for Alacrity.

  • Ensure that one Chronomancer uses
    outside of
    .


Chronomancer Support
Chronomancer 1
Build & Weapon set
  • You should play Chaos/Inspiration here. Offhand Focus for pull & Shield for CC.

Chronomancer 2
Build & Weapon set
  • You should play Chaos/Inspiration here. Offhand Pistol & Shield for CC.

  • Focus is used to pull Rigom under Samarog during the split phase.
  • is used here here for the CC phase every ~10%. Coordinate with the other Chronomancer who uses it first.
  • If you want to break Samarog more quickly you can run
    on your offhand focus.


Chronomancer Support
Tank Chronomancer
Build & Weapon set
  • Offhand Sword & Shield for Defense.
  • If you have high dps (only 1 knockback attack per phase), you should play Chaos/Inspiration.
  • If you have normal dps (more than 1 knockback attack per phase), you should play Domination/Inspiration.

Non tank Chronomancer
Build & Weapon set
  • Offhand Sword & Focus for DPS.
  • If you have high dps (only 1 knockback attack per phase), you should play Chaos/Inspiration.
  • If you have normal dps (more than 1 knockback attack per phase), you should play Domination/Inspiration.

  • yourself to share Aegis (
    ) to avoid getting knocked back. If you do so make sure to stand in only 1 part of the knockback attack.
  • As Non-Tank Chronomancer make sure to use
    outside of
    at the start of the encounter and in the last 10% phases.
  • REMEMBER TO HAVE MORE TOUGHNESS THAN THE HAND KITER!


Chronomancer Support
Both Chronomancers
Builds & Weapon sets
  • You should play Domination/Inspiration here. Offhand Sword & Shield for CC.

  • Try to Aegis share the expanding AoE for your team.
  • At the start you should swap aggro at three stacks and then swap again once you have lost all stacks for the subsequent aggro swaps. Alternatively, swap when the current tank is about to die.
  • Try to tank in the middle and face the direction of the wurms. This allows the scourges to use Epidemic on them if they are in range. Scourges can also use their
    to allows squad members to avoid large walls going through the middle.
  • Avoid moving through the boss, to prevent her from auto-attacking your squad. Her auto-attack will deal a lot of damage and can potentially down your DPS classes.
  • Note If your party lacks healing, use your
    outside of the regular to rotation to heal your squad.
  • Try to have your
    &
    for the CC when her breakbar is up.
  • You want to stay in the inner circle and knock the Flesh Golems away from the middle. Preferably you want to knock them off the platform and let them die there.
  • Staying within the inner circle of the platform will result in smaller wall spawns or walls with gaps in them. Meanwhile if you stay on the outer circle of the arena, you will get larger wall spawns, which will result in you having to needlessly move.


Chronomancer Support

  • You should play Chaos/Inspiration here.
  • One Chrono should take:
    ,
    ,
    and
    . This allows you to skip past the first section of wall spawns up to the Enervator and the last walls up to the last enevator since your portal will be off cooldown at that time again.
  • The other Chrono should run normal utilities, but replace
    for
    to block the subsequent walls.
  • Use your heal well on Desmina to heal her when she gets low.
  • Note You can’t heal her when an Enervator is channelling his attack on her.
  • There is a chance that the Chrono could go down after opening his
    , try to resurrect him as soon as you go through the
    .
  • If your team struggles to close rifts you can take a scepter in your off set to help close them.


Chronomancer Support
Both Chronomancers
Builds & Weapon sets
  • You should play Chaos/Inspiration here. Offhand Focus for pull and utility & Shield for CC alacrity and defense.

  • Broken King: One of the Chronos should run a full tank set-up here. This will allow the tank to sustain himself without help from his squad. This chrono should also go
    to remove the constant resistance so Vuln etc. applies.
  • Soul Eater: One of the Chronos will have to tank him again, however you just need sufficient toughness to hold the aggro.
  • As the tank it is your duty to move him towards the glowing platforms and keep him there. Meanwhile your team should be killing the spiders. They should then pick up the yellow orbs that spawn after the spiders die and throw them onto the glowing platform where the boss is standing. This renders him vulnerable to attacks allows two people to go up in the air to collect souls.
  • While two party members are picking up to souls in the air you will move the boss to the next glowing platform so you can repeat what you did earlier. When your team has collected 18 Souls you can kill the Eater and the fight will be over.
  • Eye duo: You have a 30 second window to kill both Eyes. Otherwise they will start healing up again.
  • Ideally you want to split into three groups; you should split into a 4-2-4 group, whereby both chronos will stay up with the [lights]. Each Chrono should throw the [lights] to their assigned side (either North or South). Always throw the lights on top of the Eye.
  • For utilities take:
    ,
    ,
    and
    .
  • gives you greater mobility to collect the lights on top.
    gives you the ability to assist your assigner party on the last 10%. Additionally you can
    across to the other side to assist the other side if you killed your Eye. Use
    on for the party that you are assisting.
  • Note you can CC the light thieves with
    and
    when they are trying to steal your light.


Chronomancer Support
Tank Chronomancer
Build & Weapon set
  • You should play Chaos/Inspiration here. Offhand Sword & Shield for defense.

Non tank Chronomancer
Build & Weapon set
  • You should play Chaos/Inspiration here. Offhand Sword & Shield for defense and Alacrity.
  • Takes first green port. If you can’t reach it reliably, drop
    for
    .

  • Again one of the Chronos should tank this boss. While you don’t need excessive amounts of toughness to tank; feel free to take Minstrel Gear for the added safety and support it provides.
  • During phase place
    so it expires after The bomb explosion.
  • When the boonstrip is about to happen, place your
    so it expires under you and your allies for the healing.
  • As tank, use your
    after each boonstrip so you can re-apply Quickness to everyone.


Feedback, Questions and Website Discussions can be found here.

Status

Raid builds: Builds are up to date. Updating the guides atm.
Benchmark page: Benchmarks are up to date. Updating the teamcomps atm.